
Expert Glass Balustrade Fixings & UK Safety
You’re probably here because the glass is the part you can picture. You can already see the clean line across […]

You’re probably here because the glass is the part you can picture. You can already see the clean line across […]
You’re probably here because the glass is the part you can picture.
You can already see the clean line across a patio in Harrogate, a balcony in York, or a stair landing in Leeds. You want the view, the light, and that open feel that timber spindles or chunky metal rails just don’t give you. Considerations often begin with the glass thickness, the handrail, or whether they want a frameless look.
But the success of the whole job usually comes down to the part that gets the least attention. The glass balustrade fixings.
Fixings decide whether the system stays straight, feels solid under hand, copes with weather, and complies with UK rules. They also decide whether an installation ages well or starts showing movement, staining, stress on the glass, or failure at the substrate. In the North of England, where we deal with exposed sites, older masonry, freeze-thaw conditions, and awkward retrofit work, that choice matters even more.
A typical conversation starts with aesthetics.
A homeowner wants a rear terrace balustrade because they don’t want to lose the garden view. A builder is pricing a balcony on a renovation and wants the neatest finish possible. An architect has drawn a crisp frameless edge and expects the hardware to disappear into the background. All sensible aims. But if the fixing strategy is wrong, the visual finish won’t matter for long.
The glass gets the praise. The fixings do the labour.
Every balustrade panel needs a reliable path for force to travel from the glass into the structure behind it. If somebody leans on the top edge, if wind pushes across the face, or if there’s movement in the deck or slab, the fixings have to control that load and transfer it safely. That’s true whether you’re using a slim base channel, stainless spigots, side-mounted brackets, or a post-and-clamp arrangement.
On site, the problems nearly always trace back to one of three things:
The best balustrade jobs feel effortless when they’re finished. The glass lines up, the fittings sit square, the panels don’t chatter in the wind, and the whole run feels planted. That doesn’t happen by luck.
It usually comes from making sensible choices early:
Practical rule: If a fixing detail looks elegant on paper but the substrate can’t reliably support it, it isn’t the right detail.
A new-build slab in Cheshire is one thing. A period stone terrace wall in Harrogate is another. Victorian brick on a Leeds conversion can behave differently again. Generic guidance often assumes clean, level, predictable backgrounds. Real properties rarely oblige.
That’s why fixings aren’t a minor accessory. They’re the foundation of the system. Get them right and the glass performs as it should. Get them wrong and you can end up chasing alignment issues, stress cracks, loose fittings, water ingress, or a non-compliant installation that should never have been signed off.
A balustrade fixing isn’t just a fastener. It’s an anchor point for force.
The easiest way to think about it is like the foundation of a wall. The visible part may be slim and elegant, but the hidden part has to absorb pressure and pass it safely into something solid. That’s the primary job of glass balustrade fixings.
When somebody puts weight onto a balustrade, the glass doesn’t “hold itself up”. The panel pushes that force into the clamp, shoe, spigot, or bracket. The fixing then transfers that load into concrete, brick, steel, timber, or stone.
If that chain is weak at any point, the whole system suffers.

Three force types matter most in practice:
A continuous base channel spreads force along the bottom edge of the glass. That gives a very different load path from a pair of spigots or a post-and-clamp setup. None is automatically “best”. The right answer depends on span, exposure, height, substrate, and desired appearance.
For frameless residential systems in the UK, guidance on choosing fittings for a glass balustrade notes that Part K applications commonly use base channel fixings with 15mm toughened laminated glass to achieve the required 0.74kN/m line load. The same source explains that if the glass is too thin, deflection can exceed the permitted 25mm under load, which increases stress on the fixings and can lead to slippage or failure.
That’s why experienced installers don’t look at clamps, shoes, or anchors in isolation. They look at:
The fitting you can barely see is often the component carrying the biggest responsibility.
A fixing can look neat and still be wrong.
Overtightened clamps can stress the glass. Underspecified anchors can move in weak masonry. A beautiful frameless detail can become the wrong choice if the slab edge doesn’t give enough reliable depth or integrity. Even gasket choice matters because metal-to-glass contact or uneven pressure can create problems long before anything visibly fails.
The practical takeaway is simple. Balustrade fixings aren’t decorative hardware. They are engineered connection points. Once you understand that, the rest of the specification starts to make sense.
There isn’t one universal fixing for every project. The right choice depends on the finish you want, the structure available, and how much adjustability the installation needs.
Some systems prioritise a near-invisible look. Others make installation easier on awkward sites. Some are forgiving on refurbishment work. Others demand a very sound slab or fascia to do their job properly.
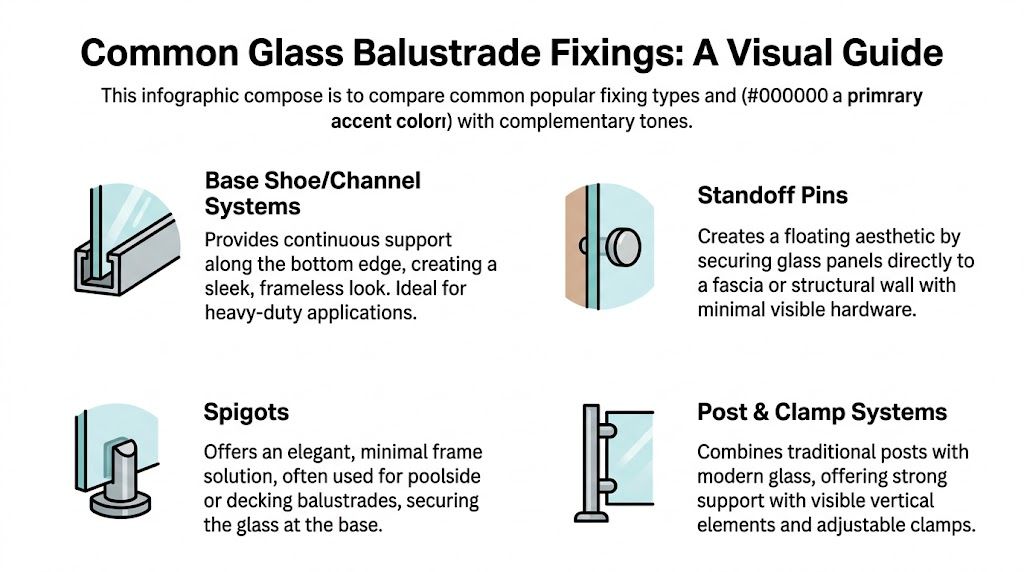
This is the fixing type that often comes to mind for a frameless balustrade.
A metal channel, often called a base shoe, runs continuously along the bottom edge of the glass. The panel sits in the channel and is secured with gaskets, wedges, or a similar engineered locking method. Visually, it gives a clean line because the support is concentrated at the base rather than broken up by posts.
For residential frameless work in the UK, the fitting guidance linked earlier explains that these systems are commonly specified with 15mm toughened laminated glass to meet the required 0.74kN/m line load in domestic settings.
What works well
What doesn’t
Spigots are individual supports fixed at intervals along the base of the glass rather than one continuous channel. They’re popular where clients want a light, open look but don’t want the full visual weight of a base shoe.
They can work well on decking, garden terraces, and pool-style barriers, especially where drainage, finished floor levels, or retrofit conditions make a continuous channel less appealing.
The trade-off is straightforward. You gain visual lightness and often a simpler localised fixing detail, but you rely on each support point being correctly set out and anchored. On an uneven existing substrate, that matters.
These are common in post-supported and semi-frameless systems.
In UK post-supported balustrades, guidance on glass balustrade fixings states that glass clamp fixings require 4 clamps per m² of 10mm minimum toughened glass to distribute a 1.1kN point load. The same source gives practical installation detail including 15-18Nm torque for suitable clamps, spacing guidance, and the use of liners to protect the glass.
That’s useful because clamp systems often suit projects where adjustability matters. Posts can help take tolerance out of an awkward stair, landing, or balcony edge. If you’re comparing hardware styles, this overview of a glass balustrade clamp is a useful reference point for understanding how visible clamp details affect both appearance and performance.
Best use cases
If the existing structure is less than perfect, post-and-clamp systems often give installers more room to achieve a tidy finish.
These fixings mount the glass to the side face of a slab, wall, or stair string rather than onto the top surface. They’re often chosen where preserving walking space matters or where the designer wants the glass to appear as if it’s floating off the edge.
Side-fix details can look superb. They also ask more of the supporting structure. The fascia or face-fixed element has to be strong enough and suitable for the anchors selected. On older masonry or repaired edges, this isn’t something to assume.
For builders working on timber decks or mixed-material outdoor projects, it can help to understand how the supporting edge is assembled before you decide on a balustrade detail. This practical guide on how to attach deck railing is useful background when you’re assessing whether the edge construction is appropriate for the fixing concept you have in mind.
| Fixing Type | Best For | Aesthetic | Typical Glass Thickness | Installation Complexity |
|---|---|---|---|---|
| Base shoe or channel | Frameless balconies, terraces, roof edges | Minimal, architectural | Often thicker laminated frameless glass | Higher |
| Spigots | Decking, patios, lighter frameless looks | Open and light | Varies by system | Moderate |
| Post and clamp systems | Stairs, refurbishments, mixed substrates | Semi-frameless, structured | 10mm minimum toughened glass in the cited UK post-supported guidance | Moderate |
| Side-fix standoffs or brackets | Saving floor space, floating edge look | Highly contemporary | Varies by engineering detail | Higher |
The main mistake is choosing by photograph alone. The better approach is to choose by substrate, exposure, and desired finish together.
Fixing type is only half the decision. The material and finish of the hardware determines how well the system copes with weather, cleaning, moisture, and day-to-day use.
That matters anywhere outdoors, but it matters more on exposed northern sites where damp, wind, grime, and seasonal temperature swings test every external fitting.
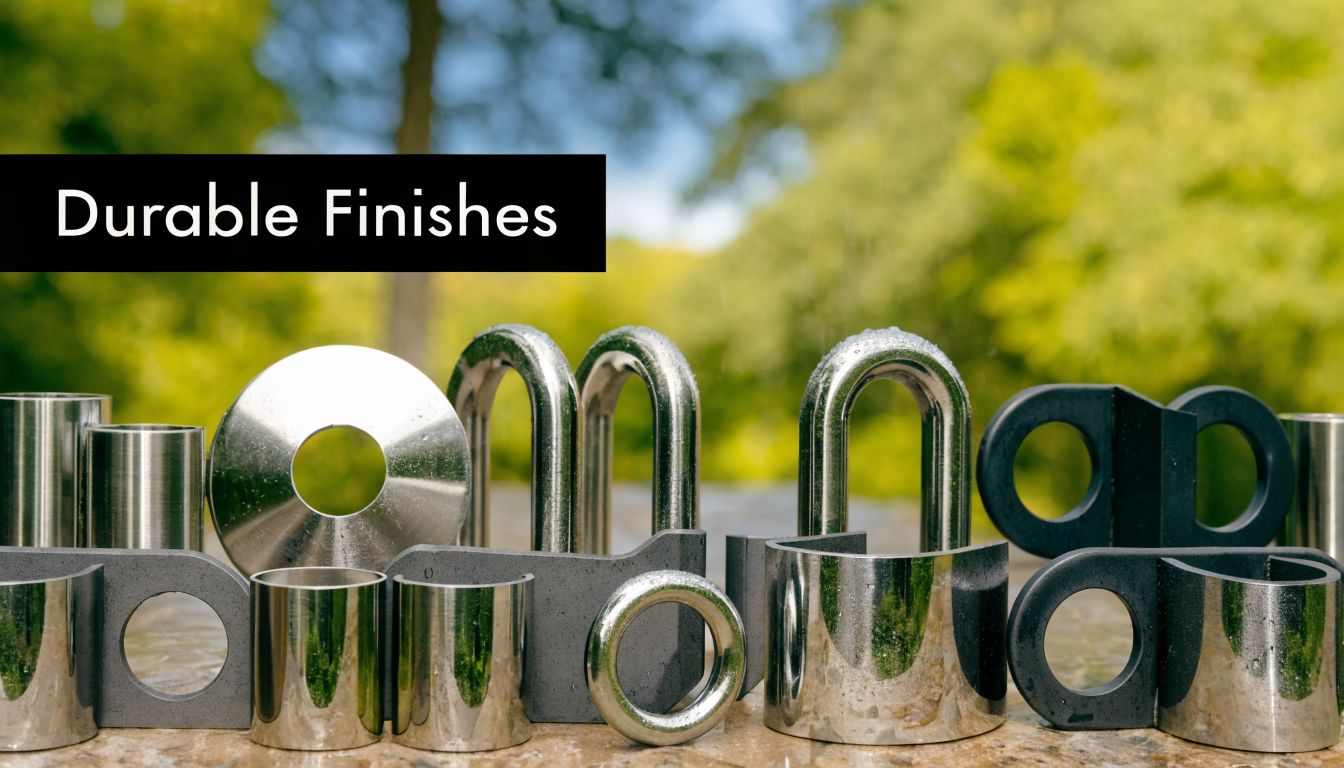
In practice, Grade 304 and Grade 316 stainless steel are commonly compared.
For inland projects in places such as Leeds, Harrogate, York, or much of Cheshire, 304 is often a sensible choice where exposure is moderate and the specification suits the environment. For more demanding locations, especially coastal or high-moisture settings, 316 is the safer decision because it offers better corrosion resistance.
That doesn’t mean every inland project should default to the cheapest option. Sheltered and exposed sites behave differently. A covered internal stair and a windswept roof terrace aren’t remotely the same job, even if the hardware style looks similar in a brochure.
Finish affects both appearance and maintenance.
A brushed stainless finish tends to be forgiving in everyday use. Polished finishes can look sharp but show marks more readily. Powder-coated or black finishes can work brilliantly in contemporary schemes, especially where they tie in with aluminium doors, window frames, or external steelwork, but they need proper product selection and a realistic approach to wear points.
A good rule on residential work is to look at nearby materials before choosing the fixing finish:
If you’re coordinating finishes across a larger scheme, details from other glass surfaces can help sharpen the palette. This guide to glass tile mosaic is a useful design reference for thinking about how reflective and matte finishes behave alongside stone, tile, and metal.
A fixing that looks pristine on day one still has to survive years outdoors.
That means thinking beyond colour and shape. Dissimilar metals, trapped moisture, exposed edges, and neglected cleaning regimes all shorten the life of otherwise decent hardware. In the North, properties in driving rain or repeated frost conditions need a fixing specification that tolerates that environment rather than merely looks right in the showroom.
A short visual reference can help if you’re comparing hardware styles and installation principles:
Before ordering, ask four simple questions:
The right material choice doesn’t shout for attention. It keeps performing.
This is the part that isn’t optional.
A glass balustrade has to look good, but it also has to satisfy UK requirements for guarding, height, loading, and deflection. Those requirements drive the fixing choice just as much as the design brief does. If the chosen hardware can’t support the required performance, it isn’t suitable, however attractive it may look.
For domestic projects in the UK, Approved Document K guidance summarised here states that internal balustrades on stairs, landings, ramps, and internal floor edges must be at least 900mm high. External balustrades on balconies, roof edges, and external stairs must be at least 1100mm high. The same guidance notes that guarding is required where floor level differences exceed 600mm, on staircases with more than two risers, or where changes exceed 380mm. At opening windows, the required height is 800mm under the cited Part B1 context.
Those dimensions aren’t just paperwork. A taller balustrade creates a longer lever arm. That increases the demand on the fixing and the structure behind it.
The same UK guidance explains that fixings must support designated loads without exceeding deflection limits of L/65 or 25mm maximum. It also notes 0.74 kN as the typical residential loading that guides fixing selection into substrates such as concrete or brick.
In simple terms, the fixing doesn’t just have to stop the glass falling over. It has to resist force while keeping movement within acceptable limits. That’s why compliance sits at the centre of specification.
For frameless systems, the linked guidance also notes that 15mm toughened laminated glass is commonly used to achieve the required residential line load in channel-fixed arrangements. For post-supported systems, the cited fixing guidance requires 10mm minimum toughened glass and 4 clamps per m² for proper load distribution.
If you’re reviewing drawings or a quotation, ask for clear answers on these points:
A practical place to review the core rules is this page on glass balustrade building regulations, which helps translate the regulatory side into specification questions that matter during design and installation.
Compliance starts before the first hole is drilled. It begins with choosing a fixing detail that can meet the required height, load, and movement limits.
Most issues don’t arise because someone ignored safety completely. They arise because somebody assumed a generic fixing detail would “probably be fine”.
That’s where problems start. A neat channel on the wrong slab edge, a clamp system paired with the wrong glass, or anchors selected without properly assessing the background can all turn a smart-looking project into a failed inspection or a future liability.
A fixing detail that works perfectly on a new, level concrete slab can become awkward very quickly on an older northern property.
That’s the reality of refurbishment work in Harrogate, York, Leeds, Darlington, Hull, Cheshire, and Cumbria. The substrate is often the whole story. You’re not just installing glass. You’re attaching a safety barrier to stone, brick, block, rendered faces, repaired edges, or weathered masonry that may have moved over the years.
Typically, generic installation advice falls short.
A period property might present strong-looking stone that’s irregular, softer than expected in places, or repaired with mixed materials. A Victorian wall can contain variable brick quality and joints that don’t give consistent anchor performance. Even newer builds can hide edge details or waterproofing constraints that affect where fixings can safely go.

That matters because a regional retrofit problem has already been identified. A 2025 UK Housing Forum report cited here noted that 62% of Northern domestic balcony retrofits failed initial inspections due to inadequate fixing adhesion on uneven masonry. Whether you’re working on a raised patio in Harrogate or a balcony conversion in York, that should sharpen the focus immediately.
Both have their place. The right choice depends on the material, the edge condition, and the fixing detail.
Chemical anchors are often useful where the substrate is variable and the installer needs a strong bond into masonry or concrete without relying on expansion in a vulnerable edge zone. Mechanical anchors can be effective where the substrate is sound, consistent, and suited to that type of fixing. The mistake is choosing by habit.
On difficult retrofit jobs, installers need to ask:
Local experience proves its worth.
Harrogate and surrounding areas often involve stonework that looks substantial but varies from one property to the next. Leeds terraces can introduce irregular brick faces and accumulated movement. In Cumbria, exposed sites demand extra care around weathering and movement. A neat catalogue detail rarely accounts for all that.
Good balustrade installation starts with reading the building properly, not forcing the building to suit a standard detail.
Northern sites punish careless detailing.
If the surface is uneven and the installer tries to pull hardware hard against it, the stress doesn’t disappear. It gets transferred into the bracket, the glass, or the anchor. If water is allowed into the wrong place, winter can make that defect worse. If movement allowance is ignored, fittings can end up under tension long after the installation team has left.
That’s why sound site practice usually includes:
On straightforward new-build work, a frameless channel or clean side-fix bracket detail can be excellent. On refurbishment projects, especially those involving old masonry, a post-supported or more adjustable system can be the wiser option even if it’s less visually minimal.
That isn’t compromising the design. It’s respecting the building.
The safest, best-looking jobs in the North usually come from balancing three things properly: the architectural intent, the substrate reality, and the long-term exposure of the site.
Once you understand how much the fixing method influences the whole job, pricing becomes easier to read.
That’s because the balustrade style isn’t just a visual choice. It usually determines the hardware family, the glass type, the installation approach, and the amount of labour involved. A slim frameless channel system and a post-and-clamp system may cover the same edge, but they won’t be priced the same way because they aren’t solving the problem in the same manner.
The on-site calculator is useful because it reduces the job to the decisions that matter.
You work through four simple steps:
Select a balustrade style
The fixing strategy emerges from the balustrade style selection. A frameless look often points toward channel or similarly minimal support. A more structured look may suit posts and clamps.
Choose toughened or laminated glass
Glass type affects both performance and cost. It also has to suit the fixing system and compliance requirement.
Decide on a top rail
Some clients want the uninterrupted edge of unsupported glass. Others prefer the feel and visual line of a top rail.
Enter the required length
Length affects the quantity of glass, fittings, and support points.
Homeowners sometimes wonder why two balustrades that look broadly similar can have very different estimates.
The answer is usually in the supporting detail. A base channel system may require different glass, different preparation, and a more demanding installation method than a post-supported setup. Side-fix details may involve more care around edge structure. Retrofit work on old masonry can add complexity even before the glass arrives.
A useful way to approach the calculator is to think in terms of project conditions rather than just style:
A calculator is excellent for giving shape to the budget. It helps homeowners, builders, and designers narrow the field quickly and compare directions before they commit to one route.
It doesn’t replace a proper look at the structure.
That’s especially true if your property is older, your edge detail is unusual, or your site is exposed. In those cases, the smart use of the calculator is to generate the starting specification, then refine it with project-specific advice so the fixing method, glass choice, and support details all line up properly.
The clearer your initial choices are, the easier it is to move from a rough idea to a realistic, installable scheme.
A glass balustrade only looks effortless when the engineering underneath it is sound.
The fixings carry the responsibility for load transfer, alignment, durability, and compliance. They decide how the glass connects to the building, how the system behaves under pressure, and how well it survives years of use in real northern weather. That’s why glass balustrade fixings should never be treated as interchangeable hardware.
The right answer depends on the whole context. The visual goal. The substrate. The exposure level. The glass type. The legal requirements. On some jobs, a frameless channel is exactly right. On others, a post-and-clamp arrangement is the better, safer choice because the property demands more tolerance and adjustability.
If you’re planning a project, pay close attention to the part that is often overlooked. The fixing detail is the foundation of the finish. If you want to understand one of the key anchoring methods used in many installations, this guide to a resin anchor bolt is a helpful place to continue.
For detailed advice on glass balustrade fixings, compliant system options, and project pricing across Harrogate and the North of England, contact Binks Balustrades.